
Skunk hair is back — and this time, it has staying power. What started as a Y2K-era goth-mall staple has re-emerged as one of 2026’s most requested salon looks: a razor-sharp, high-contrast style where two colors sit side by side with zero blending. No ombré softness. No balayage fade. Just a clean, intentional divide between light and dark.
But here’s the issue most tutorials skip: achieving that crisp contrast without color bleed or breakage requires a specific technical approach. Whether you’re eyeing the classic black-and-platinum stripe or exploring newer combinations like midnight blue against jet black, this guide covers everything — placement options, DIY step-by-step technique, a real cost breakdown, and long-term maintenance.
This is for anyone who’s seen the look on TikTok and is now deciding whether to book a salon appointment or grab a bleach kit.
Table of Contents
Key Takeaways
- What is skunk hair? → Two high-contrast colors in defined sections with zero blending — typically black and platinum/white.
- Can I DIY it? → Yes, but bleaching dark or previously colored hair carries real damage risk; first-timers should consider a salon.
- Biggest problem? → Color bleeding. Dark dye migrates into the light section if you rinse incorrectly.
- Maintenance level? → High. The platinum section needs toning every 3–4 weeks to stay white, not yellow.
- Cost difference? → DIY: around $20–$50 depending on products. Salon: around $150–$500+ depending on technique and location.
What Is Skunk Hair Dye?
Skunk hair dye is a high-contrast hair coloring technique where a defined section of hair is colored a starkly different shade from the rest — no blending, no gradient, no softening. The look gets its name from the white stripe running through the black fur of a skunk, and it works through deliberate color blocking: two shades are isolated using precise sectioning and foiling.
The classic version pairs jet black with platinum blonde or silver. But the “skunk” principle applies to any two strongly contrasting shades placed in direct adjacency.
The Y2K Roots and the 2026 Revival
The look gained mainstream traction in the early 2000s, associated with alt-music culture and a deliberately anti-mainstream aesthetic. Its 2026 revival runs on broader Y2K nostalgia — but the execution is more refined. Modern skunk hair uses cleaner sectioning, better bond-repair technology (Olaplex, K18), and a palette that has expanded well beyond the original black-and-white.
Top
Top 5 Skunk Hair Color Combinations for 2026
The color combination you choose should factor in your natural base, your skin tone, and your tolerance for upkeep. Not all skunk stripes require bleach.
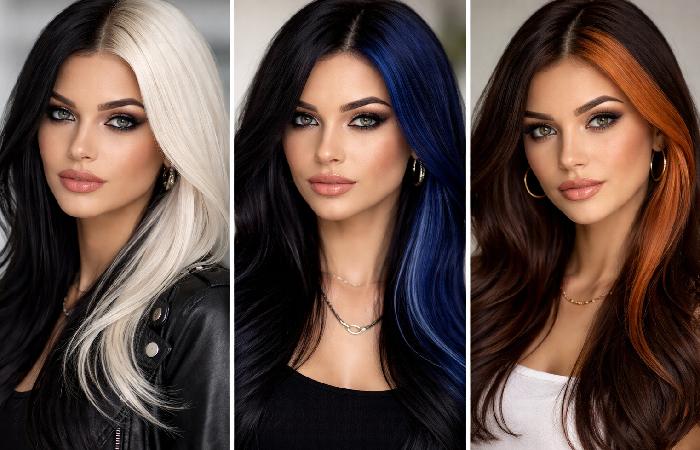
1. Classic Black & Platinum
The original. One section is lifted to a level 9–10 blonde and toned to silver or white; the rest stays jet black. It works on every skin tone and reads as both edgy and editorial. This is also the highest-maintenance option — the platinum section yellows quickly without consistent toning.
2. The “Eclipse” — Midnight Blue & Jet Black
Both sections stay dark, but one is a rich navy or midnight blue. The contrast is subtler and more wearable. Better yet, if your natural base is already dark, a semi-permanent midnight blue requires no bleach at all. This is the lowest-commitment entry point into the skunk trend.
3. Neon Pop — Pink or Green on Dark Bases
Hot pink, electric green, acid yellow against black — these variations maximize impact. You’ll need to bleach the stripe section to at least a level 8, then apply a vivid direct dye. The tradeoff: vivid colors fade quickly. Expect the neon to dull within 3–4 weeks without regular color-depositing treatments.
4. Warm Copper & Dark Brown
A workplace-friendly version trending among those who want dimension without drama. A copper or auburn stripe against deep brown reads as intentional without being “alternative.” No bleach required if your base is already a level 5–6 brown.
5. Silver & Natural Black (The “Witch” Stripe)
A narrow silver or grey stripe, placed near the hairline or parting. Inspired by fantasy aesthetics and anime, it mimics natural grey growth for an otherworldly effect. Achievable with either bleach and toner on dark hair, or grey direct dye on lighter bases.
DIY vs. Salon: The Real Cost Breakdown
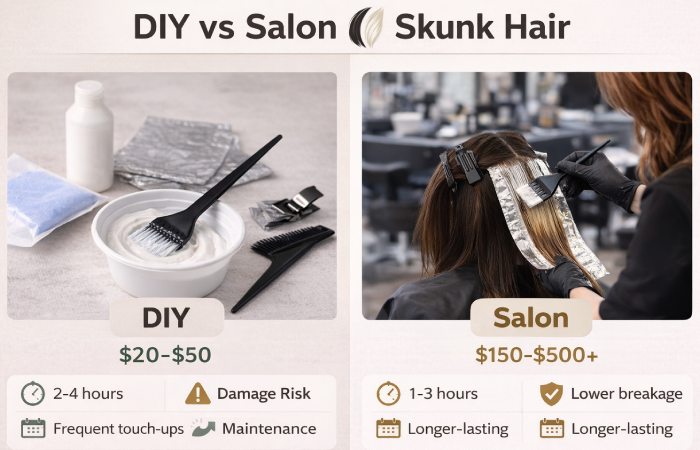
Most articles show inspiration photos and vague product links. Few actually break down what this look costs. Here’s the honest comparison:
| Factor | DIY at Home | Professional Salon |
|---|---|---|
| Cost | Around $20–$50 for bleach, dye, and basic tools | Around $150–$500+ depending on location, length, and complexity |
| Time required | 2–4 hours | 1–3 hours |
| Breakage risk | Higher (no pro bond protection or expert assessment) | Lower when using bond repair (e.g., Olaplex, K18) and professional technique |
| Tonal accuracy | Variable — higher chance of brassiness | More consistent, with professional toners and formulas |
| Color bleed risk | Higher (technique- and rinsing-dependent) | Minimal with precise isolation and separate rinsing |
| Touch-up frequency | Every 6–8 weeks | Every 6–10 weeks |
| Best for | Healthy, un-colored hair and experienced DIYers | First-time bleach, previously dyed hair, or complex placements |
The honest verdict: if you’ve never bleached your hair before, or if it already has permanent dark dye on it, the salon appointment often pays for itself. Overlapping bleach on previously processed hair is the fastest route to breakage. The $150–$300 you invest the first time protects your hair’s structural integrity for all the touch-ups that follow.
How to Dye a Skunk Stripe at Home (Step-by-Step)

If your hair is healthy and un-colored, a DIY skunk stripe is absolutely achievable. The word to keep in mind throughout is isolation — you’re not doing a regular all-over color.
Tools You’ll Need
- Rat-tail comb (for precise sectioning)
- Aluminum foil sheets
- Duck-bill or crocodile hair clips
- Barrier cream or thick conditioner
- Bleach powder + developer (20 vol for subtle lift; 30 vol for a full level 9–10)
- Violet-based toner (Wella T18, Shimmer Lights, or similar)
- Dark permanent or semi-permanent dye for the base sections
- Sulfate-free shampoo and deep conditioning mask
The Slicing Technique
- Step 1 — Section and Isolate Use the rat-tail comb to define the exact stripe you want. Popular placements: two front face-framing sections (the “money piece”), the underlayer at the nape, or a center-parted half-and-half split. Once sectioned, clip the rest firmly away. Apply barrier cream or a generous coat of conditioner to all the hair you don’t want to bleach — this prevents accidental transfer and is the step most beginners skip.
- Step 2 — Apply the Bleach Mix bleach powder with developer. Apply to the mid-lengths and ends of the isolated section first, working toward the roots last. Roots lift faster due to body heat, so they don’t need the extra processing time. Wrap in foil and check every 10–15 minutes. You’re targeting pale yellow (level 9) or near-white (level 10).
- Step 3 — Tone the Stripe Raw bleached hair is yellow or gold — and yellow is not white. That warmth is residual pigment left inside the hair shaft. Applying a violet-based toner neutralizes it, converting the yellow into silver or icy white. This is the step that creates the signature “skunk” edge. Leave the toner on for 10–30 minutes, checking regularly once it reaches your target tone.
- Step 4 — Rinse and Apply the Dark Base Rinse the toner from the light section using cool water only. Gently dry, then apply your dark dye to all remaining sections — keeping it strictly away from the freshly toned stripe. When rinsing: dark section first, then light section separately. Never rinse both simultaneously. Dark pigment in water will bleed directly onto platinum. Cool water throughout.
Safety First: What to Know Before You Bleach
Bleach is a strong oxidizing agent. According to guidance from the American Academy of Dermatology, overlapping bleach on previously processed or color-treated hair significantly increases breakage risk — and in severe cases can cause full hair loss in the treated section.
Risks for Pre-Colored or Damaged Hair
If your hair currently has permanent black or dark brown box dye on it, lifting to platinum in a single session is unlikely to work safely. Artificial dark pigment resists lifting and often requires multiple bleach sessions to remove cleanly. Trying to force it with a stronger developer (40 vol) risks severe structural damage.
Stop and consult a professional if:
- Your hair has existing box dye, especially permanent black
- Wet strands snap rather than stretch when pulled gently
- You’ve had a chemical relaxer or keratin treatment in the past 6–8 weeks
- Your scalp is sensitive, irritated, or has any open areas
- You have a known allergy to PPD (para-phenylenediamine), present in most dark permanent dyes — the FDA’s hair dye safety guidelines recommend a patch test before any new application
A strand test on a small hidden section — and waiting 24 hours — is not optional for pre-colored hair. It tells you how your hair responds before you commit the entire stripe. If you’ve ever had a strong reaction to hair dye, talk to a dermatologist or allergist before trying new color.
5 Common Mistakes and How to Avoid Them
- 1. No barrier on the non-bleach sections. Bleach drips and aerosol can lift sections you didn’t intend to touch. Thick conditioner on all adjacent hair — plus foil as a physical barrier — prevents this.
- 2. Skipping the toner. A yellow stripe isn’t a skunk stripe. Toner is what creates the platinum or silver tone that makes the contrast actually work. It’s not optional.
- 3. Overlapping bleach on touch-ups. For root touch-ups, apply bleach only to the new growth. Dragging it across already-lifted hair weakens the strand with each session until it breaks.
- 4. Rinsing both colors together. This is the number-one cause of bleed. Rinse the dark section first (tip the head forward), then the light section independently. Cool water only.
- 5. Using clarifying shampoo post-color. Clarifying shampoos strip pigment aggressively. After any color application, switch to a sulfate-free, color-safe formula for at least the first 6–8 weeks.
Maintenance Guide: Keeping Your Contrast Crisp
The skunk stripe will not maintain itself. Without a consistent routine, the platinum section turns yellow within 2–3 weeks and the dark section fades to an ashy brown.
Weekly:
- Wash with sulfate-free shampoo to protect both sections from premature fade
- Apply purple or blue toning shampoo to the light section only — leave on 3–5 minutes, then rinse; this deposits small amounts of violet pigment that offset the natural warm shift
- Cool water rinses throughout
Monthly:
- Apply a protein treatment or bond-repair mask (K18 or Olaplex No.3) to the bleached section; bleaching gradually degrades the hair’s protein structure, and without repair the strand becomes gummy and brittle over time
- Schedule a root touch-up every 6–8 weeks for a sharp line, or push to 10–12 weeks if visible root growth fits the aesthetic
When to stop and reassess: If the platinum section begins to feel like cotton wool when wet, or snaps when tugged gently — stop bleaching. Multiple bond-repair treatment sessions and a trim are the better path forward.
Who This Look Is For (and Who Should Wait)
Great fit for:
- People with naturally dark, healthy, un-colored hair who want a bold face-framing statement
- Anyone interested in the “Eclipse” or “Warm Copper” variation — both carry significantly lower damage risk than classic platinum
- Those who want a medium-commitment style change with flexibility to maintain or transition out
Wait — or book a consultation first — if:
- Your hair has permanent dark dye from previous sessions
- There are visible split ends, snapping strands, or existing chemical damage
- You’ve had a relaxer, keratin, or Japanese straightening treatment within the past 8 weeks
- You have a sensitive scalp, known PPD allergy, or any active skin conditions
Frequently Asked Questions
Q: Is skunk hair still in style in 2026?
A: Yes. The classic black-and-platinum version remains popular, but 2026 skunk hair leans heavily into non-blonde variations — midnight blue, warm copper, silver — making it more versatile than the original Y2K iteration.
Q: How much does a skunk stripe cost at a salon?
A: Expect around $150–$300 for a face-framing stripe at a mid-range salon, and $400–$500+ at a specialist colorist. Price depends on your starting color, placement complexity, and whether bond-repair add-ons like Olaplex are included.
Q: Can you do a skunk stripe on curly hair?
A: Absolutely. The contrast follows the curl pattern, creating a dimensional effect especially striking on type 3 and 4 curls. Deep conditioning is essential post-bleach, as curly hair is structurally more vulnerable to dryness after chemical processing.
Q: What’s the difference between a skunk stripe and money pieces?
A: Money pieces are thinner front highlights that typically feather softly into the rest of the hair. A skunk stripe is a wider, bolder color block with zero blending. Both are face-framing — skunk stripes are simply more dramatic.
Q: How long does skunk hair dye last?
A: Dark permanent sections last 6–8 weeks before noticeable fade. The platinum section needs re-toning every 3–4 weeks to prevent brassiness, though consistent purple shampoo use can stretch that interval slightly.
Q: Can I return to my natural color after a skunk stripe?
A: Yes, but it depends on what you used. A professional can apply a filler and permanent color over a bleached stripe. The harder problem: if you used permanent black dye on the base sections, removing it to return to natural is significantly more difficult — black is one of the hardest shades to reverse.
About Theglamourmedia
Theglamourmedia.com publishes practical, easy-to-understand content on health, technology, business, marketing, and lifestyle. Articles are based mainly on reputable, publicly available information, with AI tools used only to help research, organise, and explain topics more clearly so the focus stays on real‑world usefulness rather than jargon or unnecessary complexity.
Disclaimer
This guide is for general informational purposes only and is not a substitute for professional hair or medical advice. Chemical hair treatments, including bleach and dye, carry risks of damage and allergic reaction. Always perform a patch test, follow product instructions carefully, and consult a licensed stylist or healthcare professional if you have a sensitive scalp, existing hair damage, or a history of reactions to hair dye.