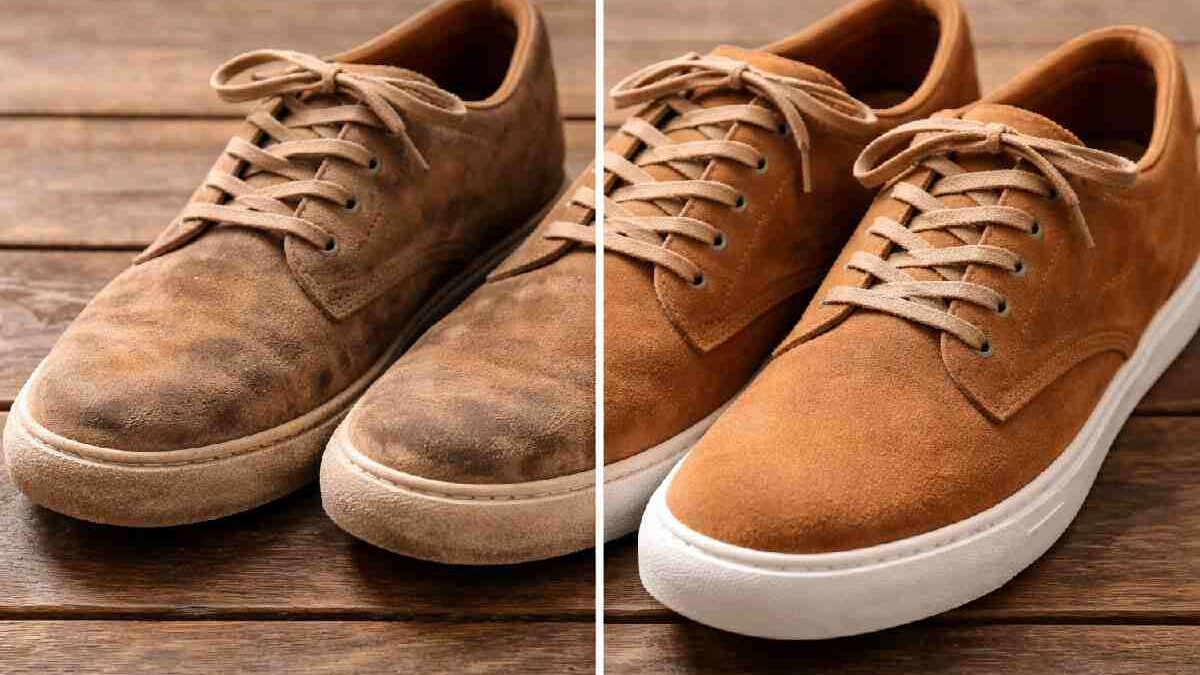
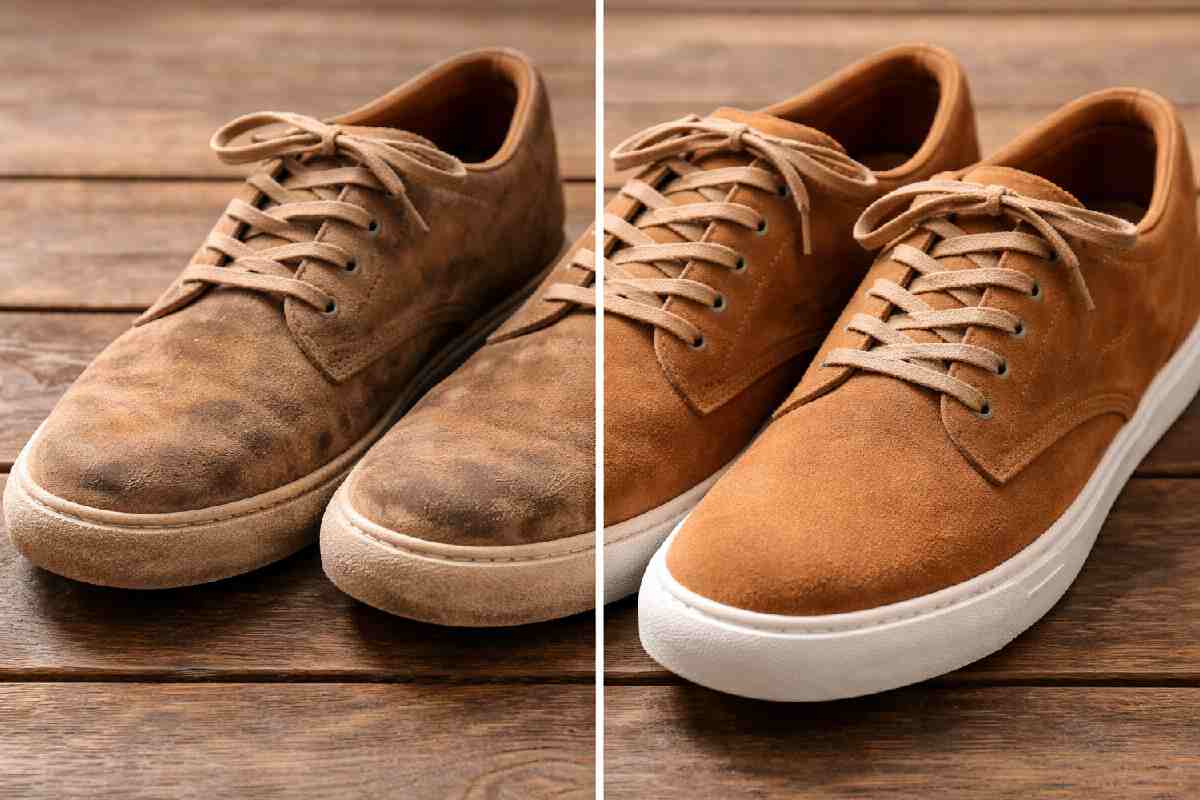
Suede shoes are one of the most stylish footwear choices you can make — and one of the most nerve-wracking to maintain. One splash of rain, one accidental scuff, and suddenly your favourite pair looks like it belongs in a bin bag. Sound familiar?
Here’s the good news: cleaning suede shoes at home is entirely manageable. You don’t need expensive professional cleaning or specialist boutiques. With the right tools and the right technique, you can restore suede shoes to near-perfect condition in under 30 minutes.
This guide covers everything — from a basic brush-down to tackling stubborn oil stains, water marks, and scuffs. Whether you’re dealing with a fresh spill or a pair that’s been neglected for months, you’ll find the answer here.
Table of Contents
key Takeaways
- What is suede? → A soft, napped leather made from the underside of animal hides — delicate but durable with proper care.
- Can you use water? → Sparingly. Too much causes watermarks and texture damage.
- What tools do you need? → A suede brush, suede eraser, and protector spray cover 90% of situations.
- How often should you clean? → Light brushing after every wear; deep clean every 1–2 months.
- Biggest mistake to avoid? → Rubbing a wet cloth on suede. It spreads stains and damages the nap.
What Is Suede — and Why Is It So Hard to Clean?
Suede is a type of leather made from the inner split of animal hides — most commonly lamb, calf, or pig. Unlike full-grain leather, suede has a soft, brushed surface created by thousands of tiny fibres called the nap. This velvety texture is what makes suede so distinctive.
But the nap is also why suede is so finicky. Those tiny fibres absorb liquid quickly, trap dirt between them, and mat down with pressure or rubbing. Apply water carelessly, and you’ll be left with a tide mark that’s harder to remove than the original stain.
The key to cleaning suede is working with the nap, not against it — and keeping moisture to an absolute minimum.
The Suede Cleaning Toolkit: What You Actually Need
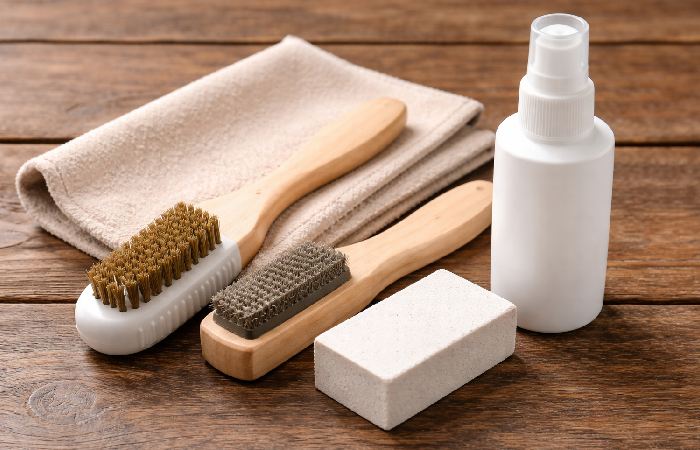
Before touching your shoes, get the right tools. Using the wrong materials — wet wipes, standard shoe polish, or household cleaners — can permanently damage suede.
Essential tools:
- Suede brush — a stiff-bristled brush (brass or nylon) for removing surface dirt and restoring the nap. This is the single most useful suede tool you can own.
- Suede eraser — a rubbery block that lifts dry scuffs and surface stains without liquid.
- Clean microfiber cloth — for blotting (never rubbing) liquid spills.
- Suede cleaner or foam cleaner — for deeper stains that a brush and eraser can’t shift.
- Suede protector spray — a waterproofing layer that guards against future stains and moisture.
Optional but useful:
- White vinegar — effective on salt stains when applied sparingly with a cloth.
- Cornstarch or baking soda — draws out fresh oil and grease before it sets.
- Shoe trees or crumpled newspaper — maintains shoe shape during drying.
You don’t need to spend a fortune. A basic suede brush and eraser set costs under £10 and handles most everyday cleaning jobs effectively.
How to Clean Suede Shoes: Step-by-Step
This is the core method for a general clean — removing surface dirt, light scuffs, and dullness. Follow these steps in order.
Step 1: Make Sure the Shoes Are Completely Dry
This is non-negotiable. Never clean suede when it’s damp. If your shoes got wet, let them air dry fully — ideally overnight — before attempting any cleaning. Cleaning wet suede causes smearing and can permanently flatten the nap.
Step 2: Brush Off Surface Dirt
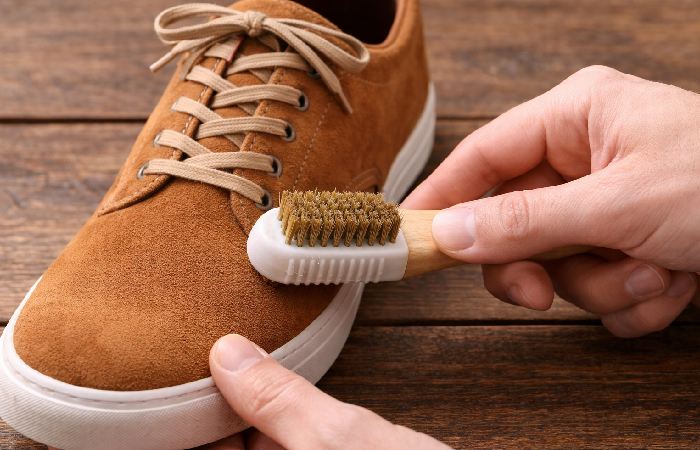
Use a suede brush to remove loose dirt, dust, and debris. Brush gently in one direction, always following the grain of the nap. Don’t scrub back and forth — this pushes dirt deeper into the fibres and can cause abrasion.
For caked-on mud, let it dry completely first, then use the brush to break it away. Trying to clean mud while wet is one of the most common mistakes people make with suede.
Step 3: Use the Suede Eraser on Scuffs and Dry Stains
For scuffs, marks, or surface stains the brush didn’t shift, rub the suede eraser directly over the problem area using light, even pressure. Work in small circular motions, then brush away the residue. Repeat if necessary — but don’t overwork any single spot.
Step 4: Apply Suede Cleaner for Deeper Stains
If the eraser isn’t enough, use a suede-specific cleaner or foam cleaner. Apply a small amount to a clean cloth or soft brush, then work it gently into the stained area using circular motions.
According to the Leather and Hide Council of America, using products formulated specifically for suede is critical — general leather cleaners often contain conditioning agents that flatten the nap and alter the texture permanently.
Keep the amount of product minimal. The goal is to lift the stain, not saturate the material.
On mixed-material sneakers, avoid getting suede cleaner on mesh or smooth leather panels; mask them with tape or wipe off any residue straight away.
Step 5: Blot and Air Dry
After cleaning, blot the area with a clean microfiber cloth to remove excess moisture. Do not rub.
Stuff the shoes with shoe trees or crumpled newspaper to maintain their shape, then leave them to air dry in a cool, well-ventilated room. Keep them away from radiators, direct sunlight, and hairdryers. Heat causes suede to stiffen and crack — the fibres are heat-sensitive in a way smooth leather is not. Allow at least 24 hours before wearing.
Step 6: Restore the Nap
Once the shoes are fully dry, use your suede brush to gently restore the texture. Brush in the direction of the grain to lift the nap back to its original, uniform appearance. This one step makes a remarkable visual difference — transforming a dull, flat surface back to velvety softness.
Step 7: Apply Suede Protector Spray
The final step is protection. Hold the spray 20–30 cm from the shoe and apply an even coat across the entire surface. Allow 30 minutes to dry before wearing.
Suede protector sprays work by forming a hydrophobic barrier that repels water and resists liquid stains. The American Cleaning Institute notes that preventative treatment is consistently more effective than stain removal after the fact — a principle that applies directly to suede care. According to professional shoe care guidance from Clarks, applying protector spray at the time of purchase offers the best long-term protection.
Re-apply every 4–6 weeks with regular wear, or whenever the shoes get visibly wet.
Stain-by-Stain Guide: How to Treat Specific Problems
Different stains need different approaches. Here’s a quick reference for the most common suede shoe emergencies.
For coloured suede (especially dark or very light shades), always patch-test any cleaner, vinegar, or alcohol on a hidden area first to check for colour change.
| Stain Type | Method | Key Caution |
|---|---|---|
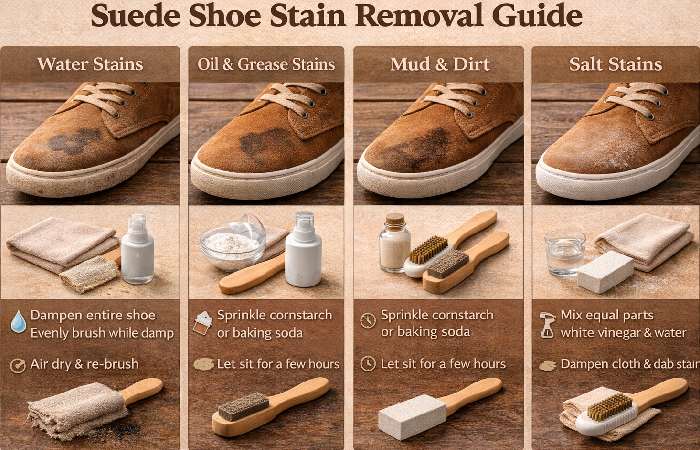
| Water / Rain marks | Dampen the whole shoe evenly with a light water mist, brush with suede brush, air dry | Don’t spot-treat — wet the entire shoe to prevent tide marks |
| Mud / Soil | Let dry completely, then brush away | Never scrub wet mud — it pushes deeper into fibres |
| Oil / Grease | Apply cornstarch or baking soda, leave overnight, brush off | Act fast — oil sets quickly and becomes very difficult to lift |
| Scuffs / Dry marks | Suede eraser, then brush | Use light pressure — heavy rubbing damages the nap |
| Salt stains | Blot with white vinegar on a cloth, then brush | Only treat once completely dry |
| Ink | Suede eraser or rubbing alcohol on a cotton swab | Test in an inconspicuous spot first |
| Chewing gum | Freeze with an ice pack in a bag, then gently pick off | Heat-based removal bonds the gum further into the fibres |
Water and Rain Stains
This one surprises people: the fix for a water stain on suede is more water — applied correctly. Only try this method if gentle brushing and spot cleaning have not worked, and never soak the shoe or saturate the suede. Use a clean cloth or spray bottle to lightly dampen the entire outer surface of the shoe (not just the stained patch). Brush in even strokes and allow to dry naturally. This evens out the moisture so no tide mark remains.
Oil and Grease Stains
Speed matters. As soon as you notice the stain, sprinkle cornstarch or baking soda directly onto the area and press it gently into the surface. Leave it overnight — the powder draws the oil out of the fibres. Brush away in the morning and assess. Repeat if oily residue remains.
Mud and Soil Stains
Counterintuitive but true: do not touch wet mud. Leave the shoes to dry completely. Once dry, the suede brush will flake away the dried mud efficiently. A suede eraser handles any remaining mark.
Common Mistakes That Ruin Suede Shoes
Here’s where most people go wrong. Knowing what not to do is just as important as the method.
- Using a wet cloth directly on suede. Water spreads stains and leaves watermarks. Always use a dry brush or eraser first.
- Applying regular shoe polish. Shoe polish is formulated for smooth leather. On suede, it clogs the nap and can permanently discolour the surface.
- Scrubbing too hard. Aggressive scrubbing damages the nap — often irreversibly. Light, consistent pressure always wins.
- Drying near heat. Radiators, hairdryers, and direct sunlight cause suede to stiffen, warp, or crack. Air drying only.
- Skipping the protector spray. This is the single biggest difference between shoes that stay pristine and shoes that deteriorate after one rainy day.
- Cleaning while damp. Always start with dry shoes. The exception is the water-stain treatment above, which is a deliberate, controlled technique.
- Using wet wipes. Many contain unknown chemicals that can strip colour or damage suede fibres.
Suede Shoe Storage and Long-Term Care
How you store suede shoes matters almost as much as how you clean them.
- Use shoe bags or boxes — not plastic bags, which trap moisture and encourage mildew.
- Insert shoe trees when not wearing them. They maintain shape and absorb interior moisture.
- Store away from sunlight. UV exposure fades suede colour gradually but measurably.
- Rotate your pairs. Daily wear on the same shoes accelerates nap damage and lining wear.
- Brush lightly after every wear — even if they look clean. This prevents dirt from settling and keeps the nap upright.
A two-minute brush-down after each use, combined with a protector spray every few weeks, will dramatically extend the life of your suede shoes. Prevention is always easier — and cheaper — than restoration.
Internal link note for theglamourmedia.com: In the storage section, link “shoe trees” → Best Shoe Storage Solutions guide (anchor: “the right shoe storage”). In the “Common Mistakes” section, link “protector spray” → Best Suede Care Products roundup (anchor: “suede protector spray”).
Who This Guide Is For — and When to Call a Professional
This guide is ideal for:
- Anyone dealing with everyday dirt, scuffs, or light staining on suede shoes
- People wanting to establish a regular maintenance routine
- Those looking to restore a neglected pair before considering replacement
- Owners of suede trainers, loafers, Chelsea boots, or dress shoes
- Owners of mixed-material sneakers (suede combined with mesh or smooth leather) — avoid getting suede cleaner on non-suede panels; mask them with tape or wipe off any residue immediately.
Consider professional cleaning if:
- The stain is large, old, or has already been treated incorrectly (especially if water or shoe polish was applied)
- The shoes were soaked through entirely
- There is visible colour loss, bleaching, or fading
- The nap is severely matted and doesn’t respond to brushing after multiple attempts
- Ink stains cover a significant area
Professional
suede restorers can re-dye, re-nap, and repair damage that home methods simply cannot fix. For a quality pair, the cost is worth it.
Final Verdict: Suede Is High-Maintenance — But Worth It
Suede shoes demand more attention than smooth leather. But they’re not fragile. The right toolkit, a consistent routine, and knowing what to avoid will keep them looking excellent for years.
The essentials: a suede brush, a suede eraser, and a protector spray. These three tools handle 90% of everything suede throws at you. Add a suede-specific cleaner for deeper stains, and you’re fully equipped.
The biggest insight? Start treating your suede shoes before they need it. A protector spray applied the day you buy them is worth more than any amount of stain removal later.
Frequently Asked Questions
Q: Can I clean suede shoes with water?
A: Water should be used with caution. Small amounts — applied via a damp cloth or mist spray — are acceptable for certain stain types, but suede should never be soaked or submerged. Too much water causes watermarks and can damage the nap permanently.
Q: What household items can I use to clean suede shoes?
A: White vinegar (on a cloth) works on salt stains. Cornstarch or baking soda absorbs fresh oil and grease. A soft toothbrush can substitute for a suede brush in a pinch. Avoid soap, detergent, or standard leather cleaners — these are too harsh for suede’s nap.
Q: How do I get scuffs off suede shoes?
A: Use a suede eraser. Rub it gently over the scuffed area with light, even pressure, then brush away the residue with a suede brush. For stubborn scuffs, repeat the process rather than pressing harder.
Q: How often should I clean suede shoes?
A: Brush lightly after every wear to prevent dirt from settling. Do a full clean every 4–6 weeks with regular wear, or whenever visible staining occurs.
Q: Can you use a toothbrush to clean suede shoes?
A: Yes — a clean, soft-bristled toothbrush is a reasonable substitute for a suede brush for light cleaning. Use gentle strokes in one direction. Hard-bristled toothbrushes can abrade and damage the nap.
Q: Is it possible to restore badly damaged suede?
A: Mild to moderate damage — flattened nap, light staining, dullness — can usually be restored at home. Severe damage, including significant colour loss, deep staining, or structural issues, is better handled by a professional suede restorer.